

Managing website tracking codes can feel overwhelming for small business owners and bloggers. After five years using Google Tag Manager for clients, I see it simplifies code management a lot. You’ll learn to set up Google Tag Manager. You’ll track essential data and gain insights about your visitors. Best of all, you won’t need to write any code on your site.
Short Summary
Google Tag Manager makes website tracking easier. It puts all your marketing and analytics codes in one dashboard. You don’t have to add tracking codes to every page. Just install one GTM container code. Then, you can manage everything through an easy-to-use interface. This guide shows you how to set up your account. It also covers using basic tags and applying advanced tracking strategies. These steps will help you understand user behavior and boost your website’s performance.
What Makes Google Tag Manager Essential?
Google Tag Manager revolutionizes how you handle website tracking codes. With GTM’s user-friendly interface, you can manage marketing pixels and analytics scripts easily. You won’t need to ask your developer every time.
The platform eliminates technical headaches I’ve witnessed countless times. One client accidentally broke their entire website when manually adding Facebook Pixel code. With Google Tag Manager, tracking codes are separate from your website’s main functions. This setup makes disasters impossible.
Small businesses particularly benefit from GTM’s cost-effectiveness. You avoid ongoing developer fees for simple tracking implementations. Local businesses can track phone calls, form submissions, and other key conversions. These metrics are important for their bottom line.
Your website’s loading speed improves when using Google Tag Manager properly. The system loads tracking codes in the background. This way, slow third-party scripts won’t hold up your page display.
Understanding Google Tag Manager’s Core Components
Your GTM account is your main hub, just like your Google Analytics account. In each account, you create containers. Think of these as separate websites or mobile apps to track.
Each container gets a unique ID, like GTM-XXXXXXX. You’ll need to install this on your website. I suggest making separate containers for each website. This helps keep things organized and stops tracking codes from mixing up.
The container holds all your tags, triggers, and variables. This setup keeps things organized. It lets several team members work together safely on your tracking implementation.
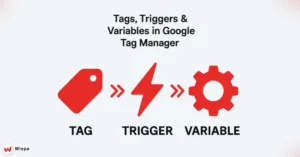
Tags: Your Data Collection Workhorses
Tags represent the actual tracking codes that collect data from your website. Common examples include:
- Google Analytics 4 configuration tags
- Google Ads conversion tracking tags
- Facebook Pixel tags
- Custom HTML tags for specialized tracking
Each tag serves a specific purpose in your data collection strategy. Starting with key tags like Google Analytics helps beginners. It avoids overwhelming them with too many choices.
Triggers: Controlling When Tags Fire
Triggers determine when your tags activate and send data. The most basic trigger fires on all page views, capturing every visitor who lands on your site. More sophisticated triggers respond to specific user interactions:
- Button clicks on your contact form
- Scroll depth reaching 75% of page length
- Video play events
- File downloads
Setting up triggers correctly helps you catch important user actions. This way, your analytics won’t be flooded with useless data.
Variables: Dynamic Data for Enhanced Tracking
Variables store information that changes based on user behavior or page content. Built-in variables like Page Path, Click URL, and Form Classes boost your tracking.
Custom variables let you capture unique information specific to your business. An e-commerce site can create variables for product categories and customer types. This helps them understand user behavior patterns better.
How Do You Set Up Google Tag Manager?
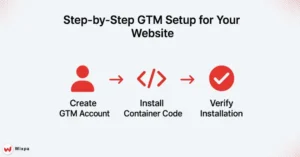
Navigate to tagmanager.google.com and sign in with your Google account. Click “Create Account.” Enter your company name. This will be your main GTM account identifier.
Next, make your first container. Enter your website URL and choose “Web” as the platform. Google Tag Manager makes two code snippets. One snippet goes in your website’s head section. The other goes right after the opening body tag.
The setup wizard gives clear installation steps. If the code placement is confusing at first, don’t worry! Most website platforms offer specific guides for GTM installation.
Installing the GTM Container Code
WordPress users can set up GTM in two ways. They can use plugins like “Google Tag Manager for WordPress.” Alternatively, they can add the code directly to their theme files. Shopify stores should paste the codes in their theme’s code. liquid file.
For custom websites, your developer should add the first script in the head section. Then, place the second script right after the opening body tag on each page. This dual placement ensures maximum compatibility across different browsers and scenarios.
Verifying Your GTM Installation
Google’s Tag Assistant Legacy Chrome extension helps verify your installation works correctly. Install the extension. Then, go to your website and click the Tag Assistant icon. This will show if GTM loads correctly.
A successful installation shows your container ID firing on page load. If you spot errors, check that both code snippets are in the right spots on your website.
What’s the Best Way to Track Page Views?
Before creating your first tag, locate your Google Analytics 4 measurement ID. In your GA4 property, go to Admin. Then, click on Data Streams and select Your Website Stream. You’ll see the measurement ID (format: G-XXXXXXXXXX).
Copy this ID exactly as shown; any typos prevent your tracking from working correctly. I keep a document with all measurement IDs for easy reference during tag setup.
Creating Your GA4 Configuration Tag
In your GTM container, click “Tags” then “New” to create your first tag. Choose “Google Analytics: GA4 Configuration” as your tag type.
Paste your measurement ID into the configuration settings. This tag establishes the connection between Google Tag Manager and your Google Analytics 4 property.
Select “All Pages” as your trigger, ensuring the tag fires every time someone visits any page on your website. This creates your foundational tracking setup.
Testing with Preview Mode
GTM’s preview mode lets you test tags before publishing them live. Click “Preview” in your GTM interface, then enter your website URL in the Tag Assistant window that opens.
Browse your website normally while Tag Assistant shows which tags fire on each page. Your GA4 configuration tag should appear under “Tags Fired” for every page view.
Publishing Your GTM Container
Once testing confirms everything works correctly, click “Submit” to publish your container. Add a descriptive version name like “Initial GA4 Setup” to track changes over time.
Published changes become active immediately on your website. Real-time reports in Google Analytics should start showing visitor data within minutes.
How Can You Track User Interactions?
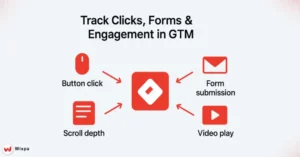
User interactions reveal more about visitor intent than simple page views. Setting up click tracking on key buttons helps you see which calls to action work best.
First, enable the “Click – All Elements” built-in variable in GTM. Then, create a new trigger selecting “All Elements” as the trigger type.
Configure the trigger to fire only on specific buttons by adding conditions. For example, track clicks where “Click Text” contains “Contact Us” or “Click Classes” contains “cta-button.”
Create a GA4 Event tag that sends click data to Google Analytics. This reveals which buttons generate the most engagement across your website.
Form Submission Tracking for Conversions
Form submissions often represent your most valuable conversions. Track all interactions, like quote requests, newsletter sign-ups, or business contacts. Each one matters.
Enable the “Form – All Elements” built-in variable, then create a form submission trigger. Configure conditions to track specific forms by their ID, class, or other attributes.
Your GA4 event tag should track form submissions. Use clear event names like “contact_form_submit” or “newsletter_signup.” This data helps optimize your conversion funnel. It also shows which pages bring in the most leads.
Other Key User Interactions Worth Tracking
Video engagement provides valuable insights into content performance. Track video play, pause, and completion events to understand how visitors consume your media content.
Scroll tracking reveals how far down the page users read your content. Set up triggers for 25%, 50%, 75%, and 90% scroll depths to identify where visitors typically leave your pages.
File downloads, especially PDFs, indicate serious interest in your content or services. Track these events to understand which resources provide the most value to your audience.
What Advanced Concepts Should You Know?
The data layer acts as a communication bridge between your website and Google Tag Manager. While basic tracking works without it, the data layer unlocks powerful customization options.
Developers can add custom info to the data layer. This includes user login status, product categories, and transaction details. This information becomes available as variables within GTM for sophisticated tracking scenarios.
E-commerce sites particularly benefit from data layer implementation. You can track conversions by pushing data from product purchases, cart additions, and checkout steps.
Custom Variables for Enhanced Tracking
Custom variables extend GTM’s capabilities beyond built-in options. JavaScript variables help you capture specific page elements or user traits for better tracking.
Regex Table variables help categorize pages or content based on URL patterns. For instance, you might create a variable that identifies blog posts, product pages, or landing pages based on their URL structure.
Lookup Table variables translate cryptic codes into human-readable descriptions. If your URLs contain product codes, a lookup table can convert them into meaningful product names for clearer reporting.
Regular Expressions in Triggers and Variables
Regular expressions (RegEx) provide powerful pattern matching for complex tracking scenarios. While intimidating initially, basic regex patterns solve common tracking challenges elegantly.
For example, the pattern “/blog/.+” matches any URL containing “/blog/” followed by additional characters. This lets you create triggers that fire only on blog posts, regardless of their specific titles or categories.
Learning basic regex patterns helps you track things easily. For example, “.*” matches anything, while “^” means it starts with a specific character. This way, you can create smart tracking rules without needing much programming knowledge.
What Are GTM’s Essential Best Practices?
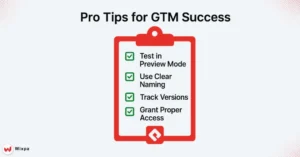
Consistent naming conventions prevent confusion as your GTM container grows. I recommend prefixes that indicate tag types: “GA4 – Page View,” “FB – Purchase Conversion,” or “GTM – Click Tracking.”
Descriptive names help team members understand each element’s purpose without opening detailed configurations. “Button Click – Contact Form” clearly indicates both the trigger type and location.
Create folders to organize related tags, triggers, and variables. Group elements by function, such as Analytics, Advertising, and Testing. You can also group them by website section, like Blog, Products, and Checkout. Choose what fits your organization best.
Version Control and Rollback Safety
Every time you publish changes, GTM creates a new version with a complete snapshot of your configuration. This version history acts as your safety net against mistakes.
- Add clear version descriptions when you publish. For example, use:
- “Added Facebook Pixel tracking for holiday campaign.”
- “Fixed broken contact form trigger.”
Detailed descriptions help you identify specific changes when problems arise. The rollback feature lets you instantly revert to any previous version if new changes cause issues. This feature lets you try advanced tracking. You can explore without worrying about breaking anything that already works.
Pro Tips for GTM Success
Start simple with basic page view and conversion tracking before attempting complex implementations. Master fundamental concepts before adding advanced features that might complicate troubleshooting.
Test everything in preview mode before publishing changes live. This habit prevents broken tracking from affecting your data collection or website performance.
Document your tracking strategy in a simple spreadsheet. List what you’re tracking, why it matters, and how the data helps your business decisions. This documentation proves invaluable when reviewing or expanding your tracking setup.
Regular audits ensure your tracking remains accurate as your website evolves. Review your GTM configuration quarterly to remove outdated tags and add tracking for new features or pages.
Final Thoughts: Transform Your Website Data
Google Tag Manager turns website tracking from a hassle into an easy task. You now know how to use advanced tracking. This gives you useful insights into your visitors’ behavior.
Remember that tracking serves your business goals, not the other way around. Measure interactions that truly affect your success. This includes form submissions, phone calls, and product purchases.
Start with the basics covered in this guide, then gradually expand your tracking as you become more comfortable with the platform. Your future self will thank you for the data insights. They will help you make better business decisions for your coffee shop, store, or online business.
FAQs
How do I add Google Tag Manager to my website?
Sign up for GTM, create a container, and add the code snippet to your site’s header and body. Then create tags, triggers, and variables for tracking.
Is Google Tag Manager free?
Yes, Google Tag Manager is free. You only pay for tools linked with GTM like Google Analytics or ad platforms, while GTM itself costs nothing.
What data can be tracked with Google Tag Manager?
GTM tracks page views, clicks, forms, videos, sales, and events. You can also set up custom metrics and dimensions for deeper analytics insights.
How do I use Google Tag Manager effectively?
Use tags, triggers, and variables wisely. Start with Google Analytics, test in preview mode, validate results, and refine tags for better conversions.
Is Google Tag Manager safe?
Yes, GTM is safe with Google’s standards. Manage user access, test tags in preview mode, and follow best practices to ensure security and accuracy.