

This guidelines will help you set up Google Tag Manager from scratch. You’ll learn everything you need, step by step. You’ll learn to create your account. Then, you’ll set up your first container. Finally, you’ll install tracking codes on your website. You can do it all without needing a computer science degree.
Setting up Google Tag Manager can be tricky, especially if it’s your first time with Google’s interface. Creating your first GTM account and container is easier than you think. I’ve helped hundreds of small business owners with this process.
Short Summary
Google Tag Manager makes website tracking easy. You can manage all your tracking codes from one dashboard. To begin, create a free Google Tag Manager account. Then, set up a web container for your site. Finally, install two code snippets on your website. The entire process takes about 15-20 minutes and requires no coding experience.
Why Use Google Tag Manager and What Is It?
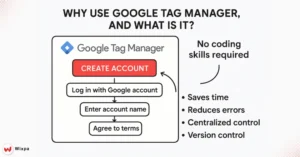
Google Tag Manager is a free tool. It helps manage all the tracking codes on your website. You don’t need to add tracking codes for Google Analytics, Facebook Pixel, or Google Ads by hand. Install GTM once. You can manage everything through its user-friendly interface with ease. Here’s why smart marketers love Google Tag Manager:
- Saves time: Update tracking codes right away. This saves time and removes the need to wait for developers.
- Reduces errors: No more broken tracking from coding mistakes.
- Centralized control: Manage all your tracking codes from one dashboard.
- Version control: Roll back changes if something goes wrong.
Think of it as having a universal remote for all your tracking needs. After you try it, you’ll wonder how you ever managed websites before.
From my work with local businesses, I see that independence is the biggest benefit. You won’t need to call your web developer every time you want to add new tracking or make changes.
Google Tag Manager Account Creation
Setting up your Google Tag Manager account is the first step in tracking. To get started, you’ll need a Google Account. You can use the same one you have for Gmail or Google Drive. It works smoothly. Follow these steps to create your GTM account:
- Go to tagmanager.google.com and use your Google Account to log in.
- Click “Create Account” in the top right corner.
- Enter your account name (use your business name or website name).
- Select your country/region from the drop-down menu.
- Check the agreement boxes after reading the Terms of Service.
Your account name should be something you’ll recognize later. I recommend using your business name or main website domain. This makes it easier when you’re managing many accounts down the road.
The account setup creates your main GTM account. You’ll still need to create a container, which we’ll cover next. Think of the account as your filing cabinet. Each container is like a folder for different websites.
What is a container and how do I set one up?
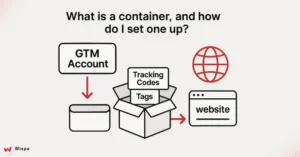
A Google Tag Manager container is a storage box. It holds all the tracking codes for one website. Each website needs a container. You can have many containers in one GTM account. Here’s how to create your first web container:
- Choose “Web” as your target platform (unless you’re tracking a mobile app).
- In the container name field, type the URL of your website.
- Click “Create” to generate your container.
Your container will receive a unique GTM ID that looks like “GTM-XXXXXXX.” This ID is crucial because it connects your website to your Google Tag Manager account. Write it down or bookmark the page where you see it.
I always tell my clients to name their containers after their website domains. For example, if your website is “yourstore.com,” name your container “yourstore.com.” This naming convention prevents confusion when you’re managing many sites.
The container is where all your tracking magic happens. This container saves all your Google Analytics tags, Facebook Pixels, and custom events.
Install GTM code snippets Installation
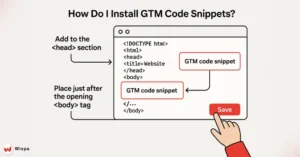
Installing Google Tag Manager requires adding two code snippets to your website. No need to worry! You have options based on your tech skills and website setup.
Method 1: WordPress and Popular CMS Platforms
Most content management systems provide GTM plugins that manage installation without user intervention.
- WordPress: Install the “Google Tag Manager for WordPress” plugin.
- Shopify: Use the built-in Google Tag Manager integration in the settings.
- Squarespace: Add your GTM ID in the Advanced > Code Injection section.
- Wix: Use the tracking tools section in your site settings.
Method 2: Manual Installation
If you’re comfortable with basic HTML or have a developer helping you:
- Copy the first code snippet and paste it into your website’s <head> section.
- Copy and paste the second piece of code right after the opening tag.
- Save and publish your changes.
The first snippet loads GTM’s JavaScript library. The second offers a backup for users who have JavaScript turned off. Both snippets are essential for proper tracking functionality.
How can I test my installation?
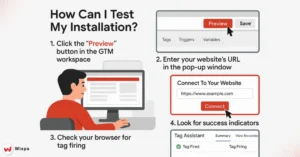
Check your Google Tag Manager setup. This ensures that your tracking functions properly before you start collecting data. Google provides built-in tools that make verification straightforward, even for beginners. Use GTM’s Preview Mode for testing:
- Click “Preview” in your GTM workspace after installing the code.
- Enter your website URL in the pop-up window.
- Check your website to verify the correct loading of GTM.
- Check the Tag Assistant tab that appears at the bottom of your browser.
Preview mode shows you exactly which tags fire on each page of your website. You’ll see a debugging panel that displays all GTM activity in real time. This is a significant aid for troubleshooting issues before your tags go live.
Test at least three pages on your website: your homepage, a product or service page, and a contact page. This ensures GTM works across your entire site, not just your main page. Common signs your installation is working:
- The Tag Assistant panel appears when you browse your site.
- Your GTM container ID shows up in your browser’s Developer Tools.
- Google Analytics (if connected) starts showing real-time data.
Pro Tips for Google Tag Manager Success
I’ve helped many small business owners with Google Tag Manager. Here are some tips that can save you time and help you avoid common mistakes.
Organization is everything from day one. Before you add tags, triggers, and variables, set a clear naming convention. Use descriptive names like “GA4 Page View” instead of generic labels.
Always test in Preview Mode before publishing changes. Many business owners disrupt their tracking because they overlook this key step. Preview Mode is your safety net.
Start simple with basic page view tracking before adding complex event tracking. Start with the basics. Then, add more advanced tracking as you need it.
Remember that Google Tag Manager is powerful, but it doesn’t replace good planning. Know what you want to track and why before you start creating tags. This focused approach prevents your container from becoming a cluttered mess.
Final Thoughts
You now have everything you need to set up your Google Tag Manager account and container. The setup process may seem tough at first, but keep in mind that thousands of business owners like you have completed these steps. Start by creating your GTM account today, even if you’re not ready to install the code immediately.
Getting your account and container ready early makes installation much smoother when you’re ready to move forward. Don’t let perfection slow you down. Your first attempt to set up your Google Tag Manager doesn’t need to track every detail perfectly. Focus on getting basic page view tracking in place first, and then gradually expand your tracking setup as you gain confidence and experience.
FAQs
1. What is a container in Google Tag Manager?
A container in Google Tag Manager (GTM) is a collection of tags, triggers, and variables for your website or app. It allows you to manage and organize all your tracking codes in one place. By placing a GTM container snippet in your website’s code, GTM executes the tags based on the conditions set by triggers, making it easier to track user behavior and measure website performance.
2. How do I find my Google Tag Manager container ID?
To find your Google Tag Manager container ID, go to the GTM account and select the relevant container. At the top of the workspace, you will see the container ID displayed in the format “GTM-XXXXXX.” This ID is unique to each container and is necessary for setting up and managing tags and triggers within your GTM account.
3. What is the purpose of a container tag in GTM?
The container tag in Google Tag Manager acts as a central point for managing all your tags. When you implement the GTM container snippet on your website, it loads the necessary tags based on specific triggers you’ve defined. It helps automate data collection, improve site performance, and gives you the flexibility to add, edit, or remove tags without editing the website’s code directly.
4. How do I add a GTM container to my website?
To add a GTM container to your website, follow these steps:
Create a GTM account and container on the GTM website.
After setting up your container, copy the provided container code (head and body snippets).
Paste the head snippet in the <head> section and the body snippet in the <body> section of your website’s HTML.