
Ready to get your products in front of millions of online shoppers? This guide shows you how to create a Google Shopping feed. You’ll turn your product listings into effective ads. We’ll cover everything from setting up your Google Merchant Center to optimizing your feed for maximum sales.
Quick Summary
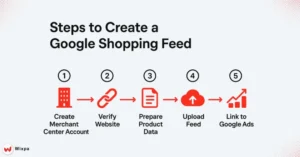
To create a Google Shopping feed, first set up your Google Merchant Center account. Then, verify it. Next, collect your key product data. This includes titles, descriptions, and high-resolution images. Make sure to format everything according to Google’s guidelines. Pick a way to create your feed. You can use a Google Sheets template or a plugin for Shopify or WooCommerce. Upload the product feed to Merchant Center. Then, fix any errors. After that, link it to Google Ads to start your Shopping campaigns.
What is a Google Shopping feed, and why does it matter?
A Google Shopping feed is essentially a digital file, like a spreadsheet, that contains all the key details about the products you sell. This file organizes your product information in a way that Google can easily understand and use to create Shopping ads. These aren’t just any ads; they’re the visually rich listings with an image, price, and store name that pop up at the top of Google search results.
For e-commerce businesses on Shopify, WooCommerce, or Magento, a strong product feed is essential. It’s the direct line between your inventory and potential customers actively searching for what you offer. Without a quality feed, your products won’t show up in Shopping ads, and you’ll miss out on a massive channel for customer acquisition and sales.
Who is this guide for?
This guide is for e-commerce store owners and marketers. It offers a simple, clear process to get products on Google Shopping. Whether you run a Shopify, WooCommerce, or Magento store, this setup guide demystifies the steps. You don’t need to be a tech wizard; if you can manage your online store, you can create a Google Shopping feed.
Google Merchant Center Setup
Before you can even think about a product feed, you need a home for it. That home is the Google Merchant Center (GMC). It’s a free tool that acts as the central hub for your product information, connecting your store’s data to Google’s vast advertising platform.
Creating Your Google Merchant Center Account
- Head over to the Google Merchant Center website and sign in with your Google account. It’s best to use the same account you use for other business tools like Google Analytics.
- Follow the on-screen prompts to enter your business information, including your store name, country, and time zone. This initial setup is quick and establishes your business identity on the platform.
Verifying and Claiming Your Website
- Trust is Key: Google needs to confirm you’re the legitimate owner of your online store’s website. This step is crucial for trustworthiness and ensures no one else can claim your site.
- Multiple Methods: You’ll be given a few verification options.
You can use several common methods:- Add an HTML tag to your homepage.
- Upload an HTML file.
- Connect via Google Tag Manager or Google Analytics.
- Claiming Your URL: Once verified, you must “claim” your website URL. This action links your site to your Google Merchant Center account. It strengthens the connection.
Setting Up Tax and Shipping Information
Accuracy here is critical because it directly impacts the final price shown to customers in your Shopping ads. In your Merchant Center account, navigate to “Shipping and returns” and “Tax” to configure these settings. Set clear shipping rates flat, weight-based, or carrier-calculated. Also, establish tax rules based on your local needs.
What are the essential product attributes?
Think of product attributes as the building blocks of your product feed. They are the individual pieces of product data that describe each item. While there are over 50 possible attributes, a few are absolutely mandatory for your feed to function correctly.
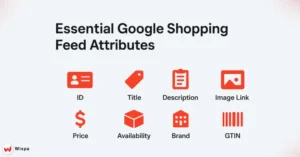
Essential Product Attributes You MUST Include
- Id: A unique identifier for each product. Your product’s SKU is a great choice here.
- Title: The name of your product. Make your product title clear and descriptive, as this is what shoppers see first.
- Description: A detailed product description. Include key features and benefits.
- Link: The direct URL to the product’s page on your website.
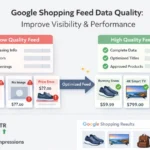
- image_link: The URL of the main product image. Use high-resolution images with a clean background.
- Availability: The current product availability (e.g., ‘in stock’, ‘out of stock’).
- Price: The price of your product, including the currency.
- Brand: The brand name of your product.
- Gtin: The Global Trade Item Number (like a UPC or EAN). This is one of the most important product identifiers.
Navigating Google’s Product Data Specification
Google provides a detailed document called the “product data specification.” It’s your rulebook. This document lists every possible attribute, explains what it means, and shows how to format it. When in doubt, always refer back to the official specification in the Google Merchant Center help center to avoid errors.
How do you choose a feed creation method?

You have several options for creating your product data feed. The best method depends on your technical comfort level, e-commerce platform, and the number of products you have. Here are the three main paths.
Option 1: Google Sheets
This is the most straightforward manual method. Google Merchant Center provides a template for Google Sheets and other tools, such as Microsoft Excel. You simply fill in the columns with your product attributes for each item. This approach is great for small inventories but can become tedious for stores with many products or frequent price changes.
Option 2: Platform-Specific Plugins & Extensions
Most major e-commerce platforms have apps or extensions designed to automate this process. Shopify offers the “Google & YouTube” channel. Plus, there are many product feed extensions for WooCommerce and Magento 2. These tools automatically gather product info from your store. They format it into a feed file, like an XML or CSV file. This saves you a lot of time.
Option 3: Advanced Options like Content API and SFTP
For big companies with many products, the Content API for Shopping lets your system talk directly to Google Merchant Center. This enables real-time updates for price and availability. Another option is setting up an SFTP (Secure File Transfer Protocol) server to upload your feed file automatically on a schedule. These are advanced methods but offer the most power and flexibility.
Uploading Your Product Feed to Google Merchant Center
Once your feed file is ready, it’s time to upload it to your Google Merchant Center account. This step connects your hard work to Google’s system, preparing your products for the spotlight.
Navigating to “Feeds” in Your Merchant Center Account
- Log in to your Google Merchant Center account. On the left-hand navigation menu, expand “Products” and click on “Feeds.”
- This is your feed management dashboard, where you will register, upload, and monitor all your product data feeds.
Registering Your New Product Feed
- Primary Feeds: Click the blue plus (+) icon to add a new primary feed. You’ll be asked for basic information like your target country and language.
- Name and Input Method: Give your product feed a memorable name. Next, select the input method you chose in the previous step (e.g., Google Sheets, Scheduled fetch for an app-generated URL, or file upload).
- Connect Your Data: If you’re using Google Sheets, you’ll link to your spreadsheet. If using a feed URL from an app, you’ll paste the URL and set a fetch schedule (daily is recommended).
Initiating the First Upload and Processing
After you register the feed, Google will begin its first “fetch” or processing. This can take anywhere from a few minutes to a few hours, depending on the size of your feed. You can monitor the progress directly from the “Feeds” section.
How do you monitor and optimize your feed?
Uploading your feed is just the beginning. The real key to success with Google Shopping ads is continuous monitoring and optimization. A healthy, optimized feed leads to better ad performance and more sales.
Checking Feed Status and Addressing Initial Errors
After your first upload, go to the “Diagnostics” tab in Merchant Center. This page is your command center for feed health. It will show any item-level errors, warnings, or disapprovals. Common issues include missing GTINs, broken image links, or price mismatches. Address any red “errors” first, as these will prevent your products from showing up at all.
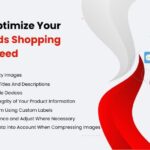
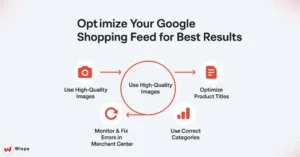
Essential Feed Optimization Techniques for Beginners
- Optimize Product Titles: Your product title is prime real estate. Front-load important keywords and include details like brand, color, size, or model number.
- Use High-Quality Images: Your product image is what grabs attention. Use high-resolution images on a white background and test different shots to see what performs best.
- Leverage product_type: Use the product_type attribute to create your own product categories. This helps with organizing Shopping campaigns and product groups in Google Ads.
- Use Google Product Categories: Select from Google’s predefined categories using the google_product_category attribute. This helps Google better understand what you’re selling.
Connecting Merchant Center to Google Ads
The final step is linking your Google Merchant Center account to your Google Ads account. In GMC, go to “Settings” > “Linked accounts” and send a link request to your Google Ads ID. Once you accept it in Google Ads, you can create Performance Max or standard Shopping campaigns to start running ads for your products.
Troubleshooting Common Google Shopping Feed Issues
Even with a perfect setup, you might run into some bumps. Here’s how to handle common problems.
Data Quality Warnings and Errors: Understanding and Resolving
Errors (red icons) are critical issues that get your products disapproved. Warnings (yellow icons) are suggestions for improvement that might limit performance. Click on each issue in the “Diagnostics” tab to see which products are affected and get guidance on how to fix the problem in your product data.
Understanding the Causes and Solutions
Products may be disapproved for various reasons. These include policy violations, such as selling banned items, and data mismatches between your feed and your website. The most common cause is a price or availability mismatch. Ensure the product information on your website always matches the data in your feed.
Ensuring Regular Feed Updates
Your product feed is not a “set it and forget it” tool. Prices change, and items go out of stock. Set your feed to automatically update at least once a day. This keeps your Shopping ads’ data accurate. It prevents disapproval and improves the shopping experience.
Your Products Live on Google Shopping!
You’ve done it! By following these steps, you’ve taken your products from your e-commerce store and placed them on Google’s digital shelf. This process opens up a powerful new channel for growth, store traffic, and sales.
Recap of the Easy Setup Process
We started by building a foundation with a Google Merchant Center account. Then we gathered our product data, chose a creation method that works for stores on Shopify or WooCommerce, and uploaded it. Finally, we learned how to monitor, troubleshoot, and optimize for long-term success.
Next Steps for Growth and Performance Max
With your feed live, the journey continues. Explore creating Performance Max campaigns in Google Ads, which use your feed to run ads across all of Google’s channels. Keep improving your product titles and images. Try different campaign strategies. Then, see your business grow.
FAQs
1. How do you create a product feed XML file?
Create a product feed XML using Google Merchant Center tools or apps. Include accurate titles, descriptions, prices, and availability. Follow Google’s data specifications and structure the file properly with unique product IDs and categories for better search visibility.
2. How do I set up an effective Google Shopping feed?
Set up a strong Google Shopping feed by adding clear titles, quality images, and correct product data. Use GTINs for better matching, keep prices and stock updated, and optimize descriptions to align with user intent for higher visibility and ad performance.
3. How do Google Shopping campaigns work?
Google Shopping campaigns use your feed to show visual product ads in search results. When users search, Google matches your product data to relevant queries. You set bids and budgets, while Google optimizes visibility to drive clicks and conversions efficiently.
4. How do I improve product titles in my Google Shopping feed?
To improve product titles, include brand, color, size, and keywords that shoppers search for. Keep titles concise and avoid promotional text. Wixpa helps you create SEO-friendly titles that boost visibility and click-through rates on Google Shopping.
5. How do I get my products on Google Shopping?
To get your products on Google Shopping, create a Google Merchant Center account and upload a compliant product feed with titles, images, prices, and descriptions. Once approved, your listings appear in Shopping results.