

Setting up website analytics can feel like navigating a complex maze. This guide simplifies the process, showing you exactly how to connect Google Tag Manager with GA4 for powerful, streamlined website tracking. By following these steps, you’ll gain deeper insights into your audience and boost your digital marketing efforts.
Quick Summary
This guide provides a step-by-step walkthrough for integrating Google Tag Manager (GTM) with Google Analytics 4 (GA4). You’ll learn how to create a GTM account, install its code, find your GA4 Measurement ID, and create the necessary configuration tag. We’ll cover key testing with GTM Preview Mode and DebugView. This helps make sure your analytics setup is correct before you go live.
Why is Unlocking Powerful Analytics So Important?
Tracking website performance and knowing user behavior are key to a successful digital marketing strategy. Without accurate data, you’re in the dark. This makes it hard to make choices that promote growth. This is where a robust analytics setup becomes indispensable.
The Challenge of Website Tracking and User Behavior
Many businesses find it hard to use different tracking codes. Tools like Google Ads, analytics platforms, and tracking pixels all require their own codes. This manual process is not only time-consuming but also prone to errors that can corrupt your data. It complicates everything from conversion tracking to understanding user interactions.
Introducing GA4 and GTM
Google Analytics 4 (GA4) is the newest version of Google’s web analytics tool. It moves from focusing on sessions to an event-based model. This change helps you understand user engagement better. Google Tag Manager (GTM) is a tool that helps you manage tags on your website or mobile app. You can easily update tracking codes and other code snippets, known as “tags.”
Key Benefits of Using GTM with GA4 for Your Website
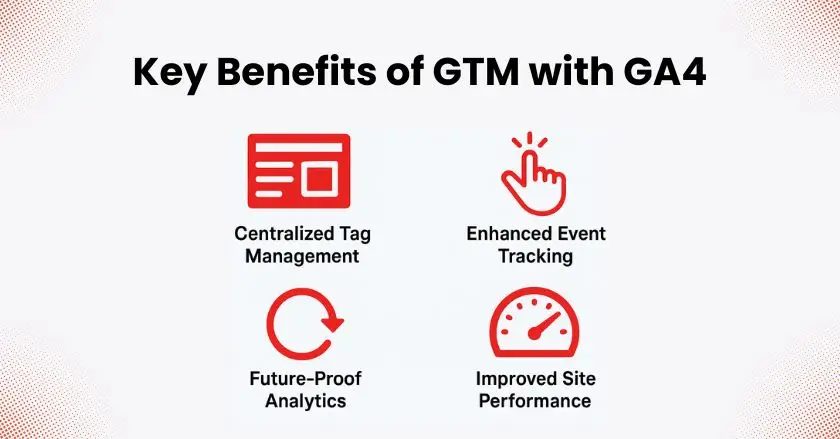
- Centralized Tag Management: Control all your tracking codes from one dashboard. This means you won’t need to edit your website’s source code directly.
- Enhanced Event Tracking: Set up custom event tracking for user actions, like button clicks or video engagement. You can do this easily, and you won’t need complex code.
- Future-Proof Your Analytics: GTM makes switching between tracking tools easy. This keeps your analytics setup flexible and ready for change.
- Improved Site Performance: GTM uses asynchronous tag loading. This reduces the load time on your website by minimizing the effect of tracking scripts.
Understanding the Foundation: GTM and GA4 Explained
Before we dive into the setup, it’s important to know what these two powerful Google products are. Understanding their strengths and how they complement each other will help you.
What is Google Tag Manager (GTM)?
Think of Google Tag Manager as a toolbox for all your website’s marketing and analytics tags. Instead of hard-coding each tracking script onto your site, you place a single GTM container snippet. You can add, edit, and disable tags easily using the GTM interface. This gives you full control, so you won’t need a developer for every little change.
What is Google Analytics 4 (GA4)?
Google Analytics 4 is the modern standard for web analytics. Unlike its predecessor, Universal Analytics, GA4 is built around user interactions and events. This structure gives a clearer view of the customer journey, from the first visit to the final conversion. It also includes strong features like predictive analytics and better user privacy controls.
Why the GTM-GA4 Combination is So Powerful?
When you use Google Tag Manager with GA4, you create a dynamic and scalable tracking setup. GTM acts as the bridge, sending rich data from your website to your GA4 property. This combination makes complex tracking, such as e-commerce tracking for product views or transaction details, much more manageable.
What is Needed for the Pre-Setup Checklist?
Before diving into the setup, make sure you have the following essentials ready. This preparation will make the process much smoother.
- A Google Account for Access
You’ll need a Google Account to create and manage both your Google Tag Manager and Google Analytics accounts. If you don’t have one, create one first. - Access to Your Website’s Backend or CMS
You will need to add a piece of code (the GTM container snippet) to your website’s header and body. This requires access to your site’s HTML or a content management system (CMS) like WordPress, where you can edit theme files or use a plugin. - Your GA4 Property and Data Stream
Ensure you have already created a Google Analytics 4 property for your website. Within that GA4 property, you must have a web data stream set up. This is where you will find your unique Measurement ID. - Familiarity with Basic Website Structure (HTML, CMS)
While you don’t need to be a coding expert, a basic understanding of your website’s structure will help you place the GTM container code correctly.
Step 1: Setting Up Your Google Tag Manager Account
First, you need to create your GTM account and install the container on your site. This is the foundation of your new tag management system.
Creating a New GTM Account and Container
- Navigate to the Google Tag Manager website and sign in with your Google Account.
- Click “Create Account.” Enter an account name (e.g., your company’s name) and select your country.
- Under “Container Setup,” enter your website’s URL as the container name and select “Web” as the target platform. Click “Create” and accept the terms of service.
Installing the GTM Container Code on Your Website
Once your account is created, a pop-up window will display your GTM container code. This consists of two snippets of code. The first goes as high as possible in the section of your website, and the second goes immediately after the opening tag.
Common Pitfalls During Installation and How to Avoid Them
One common mistake is putting the container snippet in the wrong place. This can stop it from loading properly. Another is having old tracking codes (like a global site tag from a previous setup) still on the site, which can lead to duplicate data. Always remove old analytics tracking codes before adding GTM.
Step 2: How to Connect Google Tag Manager with GA4?
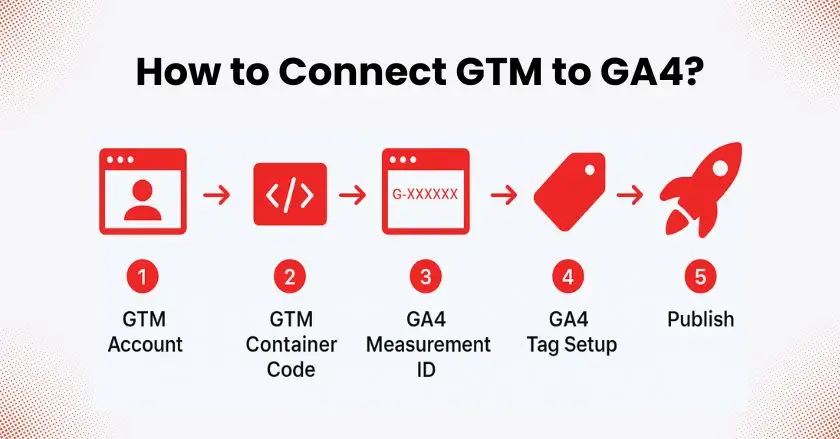
Now that your GTM container is set up, link it to your GA4 property with a configuration tag.
Finding Your GA4 Measurement ID (Tag ID)
- Log in to your Google Analytics account and navigate to the “Admin” section (the gear icon at the bottom left).
- In the “Property” column, select your GA4 property and click on “Data Streams.”
- Select your web data stream. Your Measurement ID (which starts with “G-“) will be displayed in the top right corner. Copy this ID.
Creating the GA4 Configuration Tag in GTM
- In your GTM container, go to “Tags” and click “New.”
- Name your tag something descriptive, like “GA4 Configuration.”
- Click “Tag Configuration,” choose “Google Analytics,” and then select “Google Tag.”
- In the “Tag ID” field, paste the GA4 Measurement ID you copied earlier.
- Click “Triggering” and select the “Initialization – All Pages” trigger. This ensures the GA4 tag fires on every page of your site.
Saving Your Tag and Understanding Versions
After configuring the tag and trigger, click “Save.” Every time you save changes, GTM keeps a record. If you need to revert to a previous setup, you can use the “Versions” feature to restore an older configuration.
Step 3: Verifying Your GA4-GTM Setup
Never publish your changes without testing them first. GTM provides excellent tools for verifying that your tags are working as expected.
Using GTM Preview Mode
In your GTM workspace, click the “Preview” button. This will open a new tab where you can enter your website’s URL. Your website will open in a new window with a GTM debug panel at the bottom, allowing you to see which tags are firing on each page.
Checking Data in GA4 DebugView
While in Preview Mode, go to your GA4 property and navigate to “Admin” > “DebugView.” Here, you can see the event data arriving from your browser in near real-time. This confirms that GTM is successfully sending information to Google Analytics.
Using the Google Tag Assistant Chrome Extension
The Google Tag Assistant Companion is a helpful Chrome extension that works with GTM Preview Mode. It ensures the debug panel connects correctly to your site, even across different domains or if you have certain browser extensions interfering.
Troubleshooting: My Tags Aren’t Firing in Preview Mode
- Check that the GTM container code is installed correctly on your site.
- Ensure there are no typos in your Measurement ID within the GA4 configuration tag.
- Clear your browser cache and cookies, or try in an incognito window.
- Make sure the trigger conditions are met for the tag you are testing.
Step 4: Publishing Your GTM Container to Go Live
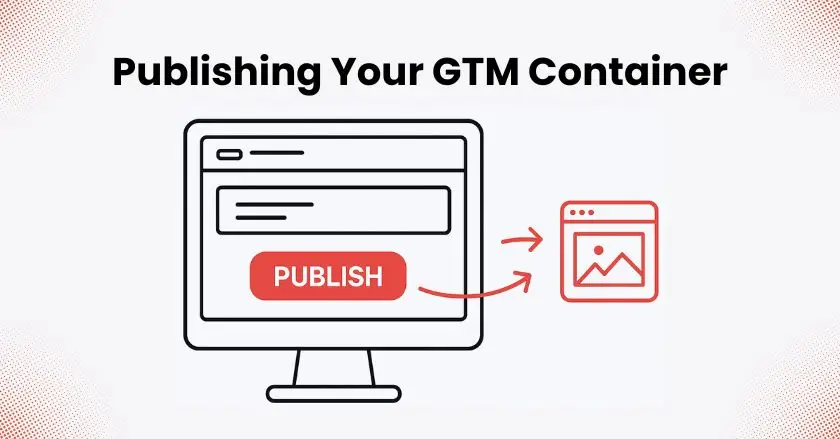
After you check that everything works in Preview Mode, it’s time to go live. Now, your changes are ready for all your website visitors.
Understanding the “Publish” Action
In your GTM workspace, click the “Submit” button. You’ll be prompted to name your version (e.g., “Initial GA4 Setup”) and add a description. This is a crucial step for documentation. After providing the details, click “Publish.” Your GTM container, including your new GA4 tag, is now active on your website.
Final Thoughts
You’ve now successfully integrated Google Tag Manager with GA4. This robust analytics setup offers you in-depth insights. It helps you grasp user behavior and fine-tune your digital strategy. While it might seem complex at first, taking it one step at a time makes the process manageable, even if you’re just getting started with analytics in your local business.
Using GTM to centralize your tracking creates a solid and adaptable foundation. This will support your business as it expands. Keep exploring, keep testing, and let the data guide your decisions.
FAQs
1. What is the difference between Google Tag Manager and Google Analytics?
Google Analytics is a web analytics tool that collects, processes, and reports on website traffic and user behavior. Google Tag Manager is a system for handling tags on your website. It helps you add and manage marketing and analytics tags, such as the Google Analytics tracking code, without needing to alter the code directly.
2. Do I need both GTM and GA4?
You can install the GA4 tracking code directly on your site; using GTM is highly recommended. It simplifies the management of all your tracking scripts, makes it easier to set up complex event tracking, and allows you to make changes quickly without needing a developer.
3. Is Google Tag Manager difficult to learn?
GTM has a learning curve, but the basics are straightforward for anyone with some technical aptitude. Setting up a simple GA4 tag, as outlined in this guide, is a great starting point. From there, you can gradually learn more advanced features as your needs evolve.
4. Can I use GTM to track conversions in Google Ads?
Absolutely. GTM is an excellent tool for managing your Google Ads conversion tracking tags. You can set up triggers for specific actions, like form submissions or purchases, and fire a Google Ads tag to record that conversion, giving you a clear picture of your campaign performance.
5. Is there an easier way to connect GA4 and GTM on Shopify?
Yes. If you run a Shopify store, apps like Wixpa Tag Manager can automatically add and manage your GTM container. This saves time and prevents coding errors.