

Setting up eCommerce tracking shouldn’t be like solving a puzzle with missing pieces. Using Google Tag Manager in many Shopify stores shows that effective tracking makes marketing smarter. It shifts decisions from guesswork to data-driven choices.
This guide shows you how to use Google Tag Manager for eCommerce tracking on your Shopify store. You’ll discover how to set up and track customer behaviour. This will help you optimise your marketing and boost your store’s performance easily.
Short Intro
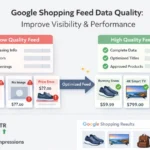
Google Tag Manager makes eCommerce tracking easier for Shopify stores. It puts all your marketing tags in one place. You don’t need to edit theme files for each tracking code. You can easily set up Google Analytics 4, track conversions, and add custom pixels using GTM’s interface. This method cuts down on duplicate tracking. It boosts site performance and simplifies managing marketing measurements.
Why Is GTM Essential for Shopify Success?
The Modern eCommerce Landscape and Data Needs
Running a successful Shopify store means juggling multiple marketing platforms simultaneously. You might be running Google Ads, Facebook ads, and email marketing with Klaviyo. You could also be using different analytics tools to understand customer behaviour.
Each platform usually needs its own tracking code added to your theme files. This makes it hard to update tracking scripts or fix conversion measurement problems.
What is Google Tag Manager (GTM)?
Google Tag Manager acts as a central hub for all your website tracking codes. You don’t need to hardcode each marketing pixel into your Shopify theme. Just install one GTM container snippet. Then, you can manage everything else through GTM’s web interface.
This tag management system lets you add, change, or remove tracking scripts easily. You don’t need to edit your website’s code. For Shopify store owners, this means faster setups and less trouble with developers.
Why GTM is Crucial for Shopify Stores
![]()
Performance Benefits: GTM loads tracking scripts asynchronously. This means slow-loading marketing tags won’t slow down your site speed.
Version Control: Each change in GTM makes a new container version. This lets you quickly roll back any problematic updates.
Simplified Management: You can adjust Google Analytics settings, add conversion events, or make custom tracking. This can be done without changing theme files.
Enhanced Debugging: Use GTM’s preview mode and Google Tag Assistant to fix tracking issues quickly. You won’t have to sift through theme code.
How Do You Set Up GTM for Shopify?
Creating a Google Tag Manager Account and Container
Visit the Google Tag Manager website and create a new account for your business. Within that account, create a container specifically for your Shopify store. Choose “Web” as your container type since you’re tracking a website.
GTM gives you two code snippets once it’s set up. One goes in the head section of your website, and the other goes right after the opening body tag.
Installing the GTM Container Snippet on Shopify
Navigate to your Shopify admin panel, then go to Online Store > Themes > Actions > Edit Code. Locate your theme. Liquid file and paste the first GTM code snippet just before the closing tag.
The second snippet goes immediately after the opening tag in the same file. Save your changes, and your GTM container is now active on all pages of your Shopify store.
Pro tip: Always use GTM’s preview mode to test your installation. This helps ensure everything fires correctly on your checkout and product pages before you publish changes.
What Makes GA4 Perfect for Shopify Tracking?
Why GA4 is the Standard for eCommerce Analytics
Google Analytics 4 took over from Universal Analytics as Google’s main analytics tool. It offers better ecommerce tracking features made for today’s online shops. GA4’s event-based tracking model aligns perfectly with how customers interact with eCommerce websites.
GA4 automatically tracks many ecommerce events, unlike Universal Analytics. This means Shopify stores can easily see customer behaviour patterns without extra setup.
Setting Up Your GA4 Property
Set up a new GA4 property in your Google Analytics account. Then, turn on Enhanced Ecommerce tracking. Note your GA4 Measurement ID (it starts with “G-“) as you’ll need this for your GTM configuration.
Configure your GA4 property settings to match your business location and currency. Make sure your GA4 settings show your main business location, whether you cater to local or international customers.
Configuring the GA4 Configuration Tag in GTM
In your GTM container, create a new GA4 Configuration tag using your Measurement ID. Set this tag to fire on all pages using the “All Pages” built-in trigger.
This configuration tag manages basic page views. It also lays the groundwork for all the GA4 ecommerce events you’ll add later.
Understanding Shopify’s Data Layer Integration
What is the Data Layer?
The data layer serves as a standardized way to pass information from your website to GTM. Think of it as a translator. It changes your website’s information into a format that marketing tags can understand.
Shopify fills the data layer with useful ecommerce info. This includes product details, what’s in the cart, and purchase data when customers shop at your store.
Leveraging Shopify’s Built-in Data Layer for GA4
Shopify’s built-in integration has pre-set data layer events. These events match GA4’s Enhanced Ecommerce needs. This means many standard ecommerce events work automatically without custom coding.
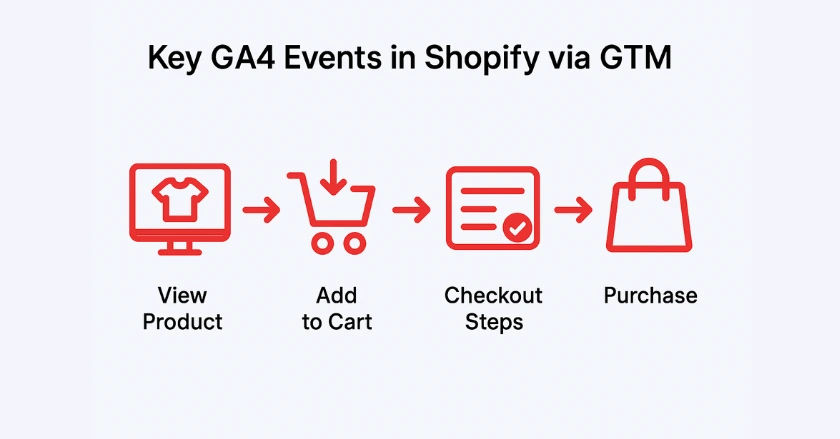
The platform sends events to the data layer, like page_view, view_item, add_to_cart, and purchase. This happens whenever customers perform these actions in your store.
Key Standard E-commerce Events Tracked by Shopify
Product Views: This triggers when customers look at product pages. It captures the product name, category, and price information.
Add to Cart: Triggers when items are added to the shopping cart, including product details and quantities.
Checkout Steps: Shows your progress from the start of checkout to entering payment details.
Purchases: Keeps track of all transaction details, including revenue, tax, shipping costs, and item specifics.
How Do You Set Up GA4 Events in GTM?
Tracking Product Views (view_item)
Create a GA4 Event tag in GTM with the event name “view_item”. Set up the tag to get product info from Shopify’s data layer. This includes the item ID, product name, category, and value.
Set up a trigger that fires this tag when the data layer receives a view_item event from Shopify. You can track all your product pages accurately. There’s no need to set up each item by hand.
Tracking Add to Cart (add_to_cart)
Create an add_to_cart event tag. This tag will track when customers add items to their shopping cart. Use GTM variables to pass item details, quantities, and product values from the data layer to GA4.
The trigger for this event should listen for Shopify’s add_to_cart data layer event. This way, it will work well on various product page layouts and cart setups.
Tracking Checkout Steps
Set up multiple GA4 event tags for different checkout stages:
- begin_checkout: Fires when customers start the checkout process
- add_shipping_info: Triggers when shipping information is provided
- add_payment_info: Captures payment method selection
Each event must have key ecommerce details. This includes cart value, item count, and shipping info if necessary.
Tracking Purchases (purchase)
The purchase event captures your most valuable conversion data.
Set up this GA4 event to include:
- Transaction ID
- Revenue
- Tax
- Shipping
- Currency
- Detailed item information
Set the trigger to activate only on your order confirmation pages. Use Shopify’s purchase data layer event for precise revenue tracking. This helps avoid duplicate tracking issues.
Can GTM Track Advanced User Activity?
Tracking Outbound Clicks and File Downloads
Set up custom triggers in GTM to track when customers click on external links or download files from your store. These interactions provide valuable insights into customer engagement beyond basic ecommerce events.
Set up click triggers for specific link patterns or file types. Then, send this data to GA4 as custom events. This helps with a complete analysis of user behaviour.
Tracking Form Submissions
Set up triggers in GTM to track:
- Newsletter signups
- Contact form submissions
- Other lead generation activities.
This data shows the entire customer journey, from the first visit to the purchase.
Set up these triggers to capture form IDs. This lets you send valuable event data to your analytics platforms for analysis.
What advanced GTM features help Shopify stores?
Customising the Data Layer for Specific Needs
Shopify’s built-in data layer tracks standard ecommerce events. But you may need extra custom tracking for your specific business needs. Work with developers to send custom events for special actions. This includes watching product videos or adding items to wishlists.
These custom events help your conversion tracking. They provide clear insights into customer behaviour based on your store’s unique features.
Leveraging GTM Variables for Dynamic Tracking
GTM variables let you set up tracking changes for different products, categories, or customer groups. Use data layer variables to customise tracking. This can be based on product features or customer details.
This approach enables sophisticated marketing measurement without hardcoding values into your tracking setup.
Building Advanced Triggers and Rules
Develop complex trigger logic that combines multiple conditions for precise event firing. For example, create triggers that start conversion events for orders above certain amounts or specific product categories.
These advanced triggers help you better segment your conversion data. You can then optimise your marketing based on important customer actions.
Pro Tips for GTM Success
- Test Everything: Always use GTM’s preview mode. Also, use Google Tag Assistant to check your tracking setup. Do this before you publish changes to your live container.
- Document Your Setup: Write clear notes on your GTM setup. Include details about custom variables and trigger logic. This will help with maintenance and troubleshooting.
- Monitor Performance: Regularly check your GTM setup. This helps make sure tracking scripts don’t slow down your Shopify store or harm the user experience.
- Stay Updated: Shopify often updates its data layer. So, keep an eye on your tracking for any changes that could affect measurement accuracy.
Final Thoughts: Transform Your Shopify Analytics
Using Google Tag Manager for eCommerce tracking turns your Shopify store into a powerful data collection tool, not just a sales site. Proper tracking will help you make smarter marketing decisions and improve business results.
Begin with the main GA4 ecommerce events in this guide. Then, as you get used to GTM’s features, slowly broaden your tracking skills. Accurate data collection is key to all successful digital marketing strategies.
FAQs
1. How to add GTM code in Shopify checkout?
To add Google Tag Manager (GTM) to Shopify, insert the container code in your theme. Liquid file. Place it before the tag and right after
. You can only track the full checkout process on Shopify Plus. With it, you have access to checkout. Liquid for complete event tracking.2. What is GTM Shopify?
GTM Shopify means using Google Tag Manager inside your Shopify store. You can manage all your tracking scripts, like Google Analytics, Facebook Pixel, and TikTok Ads, from one dashboard. This saves you from editing code each time. As a result, your store runs cleaner and faster.
3. How to connect Shopify and Google Analytics accounts?
You can link Shopify and Google Analytics. Copy your GA4 Measurement ID. Then, paste it into Shopify Settings under Customer Events. This setup helps you track user behaviour, sales funnels, and traffic sources. You’ll gain insights to boost conversions.
4. Which payment method is best for Shopify in Pakistan?
Shopify Payments isn’t available in Pakistan. So, the best choices are 2Checkout (Verifone) and PayFast Pakistan. Both are reliable and widely accepted. Many merchants use Payoneer to withdraw funds. Some set up Stripe with a registered US or UK entity.
5. What is the purpose of Google Tag Manager?
The purpose of GTM is to simplify how you add and manage tracking codes on your Shopify store. GTM lets you deploy and update multiple pixels without pasting them into your site code. This keeps your store optimised and flexible for marketing campaigns.